#intro to 3d modeling
Explore tagged Tumblr posts
Visit Tumblr Blog
Explore Tumblr blogs with no restrictions, modern design and the best experience.
Last Seen Tumblr Blogs


Fun Fact
130K people were victims of a chain letter scam that affected Tumblr in May 2011.
Text
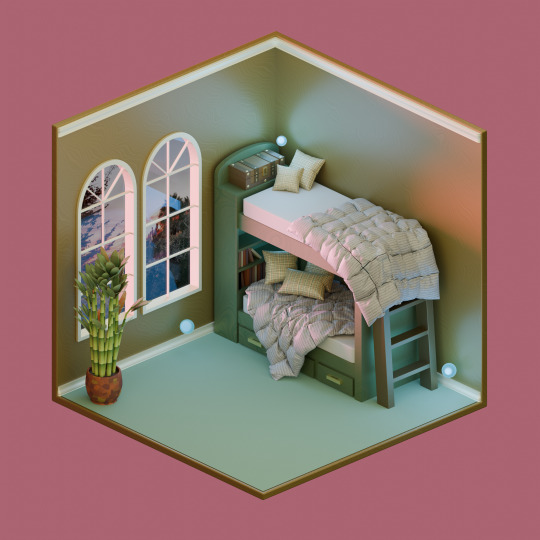
Second 3D modeling project in Blender. Took WAAAY longer to render because we were encouraged to bevel, and subdivide, and smooth everything to make it all look as naturalistic as possible. Followed online tutorials for the blankets and pillows and made the bamboo all by myself :)
#art#artists on tumblr#secretlyditto#digital art#digital artist#intro to 3d modeling#3d model#3d art#3d modling#blender
8 notes
·
View notes
Note
A-anime?
you know, sometimes I forget that Twst is actually an isekai that starts with the protagonist getting run over by an inexplicable horse-drawn carriage. and every time I'm reminded is a delight because that's AMAZING.
also. look. okay. there's a lot of very fun stuff in the trailer but I am obsessed with that Crowley surprised pikachu face. me when I spend all my keys and gems literally hours before they announce overblot SSRs and drop the anime trailer:

#twisted wonderland#twst anime#<- gonna use that for anime stuff in case anyone wishes to filter it#this is the point where i once again have to admit that i have not really read the manga#(i've liked what i've seen but it's very hard for me to keep up with stuff a lot of the time)#(the anime may actually be easier for me to absorb it in :')#god i GOTTA draw the manga yuus#i kept meaning to when yuuna got revealed but i didn't get around to it before 7-13 ate my brain 😭#anyway the bits they chose for the trailer are pretty interesting to me!#like i think chances are good it was mostly from that one sequence because given the timeline#they probably don't have a ton of 100% finished post-comp footage yet so they probably just took what they have#but also i'm thinking back to how deliberately vague all the game promo stuff was#and...okay again i don't really know how they did it in the manga but i am reminded of how overblotting was actually like. a twist.#a twst twist#like we were introduced to it in the prologue with the mine phantom#but riddle's overblot was an actual SURPRISE and like. an instant reveal that okay THIS is what the story's gonna be about#so i'm just kinda wondering if the anime promos might also like...actively try not to spoil everything#or if they're gonna go full anime-intro 'here's all the super spoilery scenes you can expect to see :)'#basically is the marketing gonna skew towards new viewers or established fans. both valid i'm just curious!#also excuse me for a moment as i reveal myself as a hugely pretentious snob but#oh my god the backgrounds actually have some texture and shape and are taking style cues from the game backgrounds#oh my god the castle exterior actually looks illustrative and fantastic and isn't just a 3d model they plopped in#it's hard to tell at this point how consistent that'll be since most of the trailer is in the mirror chamber#but i'm just SO happy to see it! hopefully this means they weren't crunched to fuck and are able to really go ham#(the pre-isekai scenes all look more generic modern anime so like...is that a conscious artistic choice they made)#(because that would be incredible. holy shit.)
1K notes
·
View notes
Text
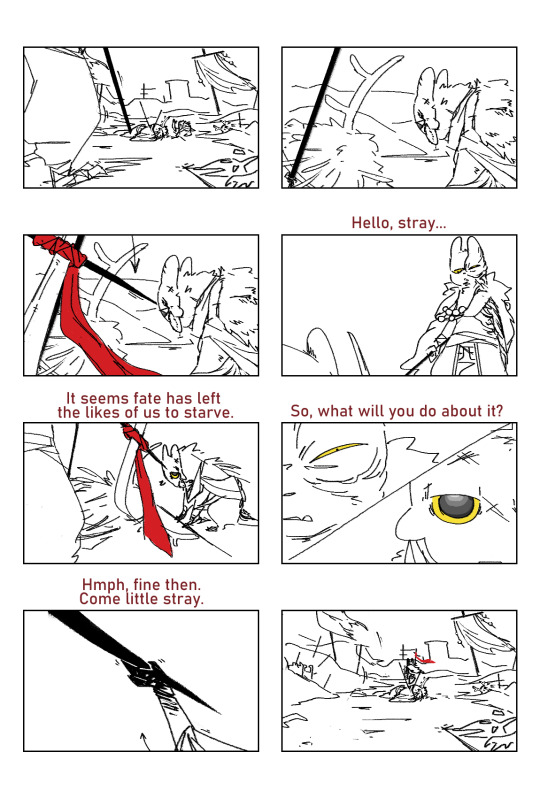
i had an idea for arti during her exile arc
#rain world#rainworld#my art#rw anthro au#rw artificer#im so fucking cooked guys#the brainrot hit hard this time around#anyways thats enough rw brainrot for like the next month me thinks#back to 3d modeling#also yes this is just the intro scene of sekiro lol i like sekiro
191 notes
·
View notes
Text

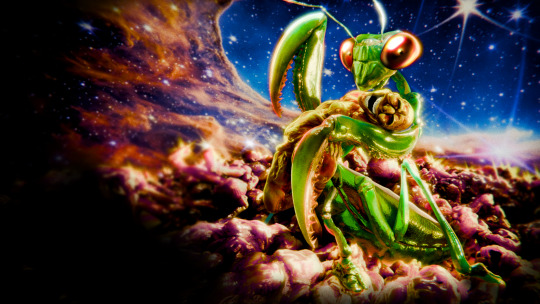
There, apparently, exists an eternal space mantis—and every year, an exorbitant amount of tax dollars fund the flight of the world’s Most Important Men into its orbit. This is a process seen as both aspirational and deeply necessary. As far as we know, there is probably no greater honor than being cannibalized by an eternal space mantis.
Throughout the last century or so, we have been repeatedly made aware of the increasing pile of corpse-parts floating in space. At some point it reached planetary proportions, and has recently met the qualifications needed to designate it as a planet. It has not yet been named, but it is colloquially referred to as “That One Planet Made Entirely Out of Human Corpses”. Located between Venus and Earth, it is one of the easiest planets to see through a telescope. It is a great science experiment for children, who often aspire to to study astronomy shortly after seeing it.
The mantis itself is a recent discovery. We knew these people were dying, but not necessarily due to an eternal space mantis. The chances of it being an eternal space mantis honestly seemed pretty low. Evidence of its existence first came in the form of an accidental audio transmission from Daniel M. Hubbard, the former CEO of Brisco Group Inc., undergoing the process of cannibalization. We know this to be the case due to the contents of the transmission: approximately five unremitted minutes of rapturous moaning.
But what does it mean to be cannibalized by an eternal space mantis? Cannibalism, famously, is defined as the act of consuming one’s own kind. Indeed, this is not a misnomer—to be consumed by an eternal space mantis is to become one and the same. It is unclear when exactly the distinction between man and mantis is made indiscernible, but it is theorized to be the moment the flesh makes its entrance into the mouth.
The mantis most likely eats because it is hungry.
#my art#3d art#blender#insects#Final for one of my intro 3D classes! I decided to include my required short story as well.#Devising any scenario which would necessitate modeling a big huge mantis was my sole motivator.#I have not slept. But it was worth it. For the mantis.#I need to go look at something that isn't a mantis now. Goodbye.
84 notes
·
View notes
Text


#--/ art#--/ story#ava the dark lord#⬇⬇⬇ context in the tags ⬇⬇⬇#alan becker#animator vs animation#animation vs minecraft#ava the chosen one#it is done !! ok ill give y'all the intro context synopsis now#the story goes that way way way way before Showdown cho and dark used to sneak into abandoned-looking buildings in the city at night#and one such target they stumble upon happens to be a storage room containing artifacts from Minecraft#the most interesting being the beds.#on this particular outing cho and dark were returning from other shenanigans and could use a place to rest. perfect!#dark belly-flops onto the right bed (scooting them out of alignment) and strikes a pose.#while chosen is shoving them back together again... oh. he's already asleep? ...???#!!! the beds draw you in if you get too close!#so what was supposed to be half an hour at most rest turned into the whole night. they skedaddled and forgot about the freaky beds.#until. a certain someone goes and dies :333#you get it now ! ! !#it was dark diesn't ALL ALONG-#yeah and then for extra spice i threw in that the hooded stick King meets with during his episode to buy a command block...#...happens to own that storage room.#thus and so begins more brand new shenanigans with dark interacting with this shady rando. i call em seafoam#i highly extremely doubt there's a tag for seafoam . . . wiki calls them only 'hooded stick figure'#anyhow. behind the scenes this was also a practice of drawing things in 3D... keeping on model... and composition for storytelling#and i learned some things about how Whiteboard works too :o i. didn't know about the fill tool. it is cool#yayaya!! so that's been in my head for a while.#thx for reading <3 <3 ill be posting some close-up shots of this and other things i put on the whiteboard later#Minecraft bed
339 notes
·
View notes
Video
tumblr
Virtua Fighter 3tb (AM2 - Sega Model 3 - 1996)
#Virtua Fighter 3tb#Virtua Fighter 3#AM2#Sega#Sega Model 3#fighting games#3D fighter#game intros#game intro#i'll do a better playthrough of this eventually
77 notes
·
View notes
Text
ive only seen / heard the european and singaporean versions of the house intro so ideally i can enjoy teardrop by massive attack in a non house way. of course it doesn't matter and as soon as the song plays im like 🏠🏠🏠🏚️🏚️🏠🏚️🏚️🩺🩺🩻🩺🩺🥼🩻🩺🥼⚕️⚕️⚕️⚕️⚕️🏥🏥🚑⚕️
#desire mona#just knowing the song exists somewhere in that context makes it impossible to detach#which is fine of course like i like the show obviously and teardrop bangs in any context#but#sometimes i wanna hear a banger and have my OWN daydream instead of daydreaming the house md intro shot for shot#im always like hm. 3d model of a head hugh laurie. jennifer morrison boat. omar epps xray (i think). robert sean leonard brain.#cest la vie#house md#hate crimes md
19 notes
·
View notes
Text

Did I already put this in here? idk. Re-taking my 3D modeling class because we're learning Blender instead of Cinema 4D. Started of by making a low poly little house and environment and we ACTUALLY learned how to apply materials and light to the scene during our first assignment. Very happy with my progress!
#art#artists on tumblr#secretlyditto#digital artist#blender#3d modling#low poly#intro to 3d modeling#3d art#digital art
10 notes
·
View notes
Text
Introduction
Hey, I'm StarScape. You can also call me Teddy or Starrzy it doesn't really matter.
I'm a minor (13-17), and I'm okay with any pronouns.
I make digital art with clip studio and 3d models with blender. Sometimes I'm fast, and sometimes I take days, so my uploading is going to be very inconsistent.
I'm into several things, such as Splatoon, Adventure Time, Murder Drones, the list goes on really.
COMMISSIONS: OPEN (Art and Avatars)
THE LINK TO MY ARTISTREE!!
Here's my Strawpage!
And my side Splatoon project.
AND the Update blog for my VRChat world
My Pearl Houzuki Ask Blog
Thready Patches Wiki Page (dandys world OC)
OTHER SOCIALS!!
My Bluesky (direct art posts, barely any filler stuff)
My Twitter (MOSTLY reposts)
My Instagram (direct art posts, no filler stuff)
TikTok (not very active, but posts my favorite pieces)
RedNote (direct art posts)
I'm Pearl's N1 fan btw, nobody else can compete.
I guess that's pretty much all you need to know. Bye!
16 notes
·
View notes
Text
I continue to make the design for my Twitch and Telegram channel. I stream every week from Friday to Sunday
#3d#artists on tumblr#twitch#streaming#blender#3d artwork#digital artist#art#art digital#animation#3d motion#3d model#motion#blog intro
0 notes
Text
Needle Felt Siffrin Build Log: (oct 6 - nov 20, 2024)


Credits goes wholely to @insertdisc5 for creating ISAT and siffrin's design! I am just here to attempt to make cool fanart (and get more people to play isat.. my devious plans are going great so far :3) As always, this isn't a tutorial- it is just a log about how i go about approaching a sculpture and I hope this collection of resources can help others make their own sifs!!
PSA: this has some spoilers for endgame CGs/sprites on my references image board ( also might see it in the backgrounds of my process pics). And bc this is needle felting, you will see some sharp needles! beware!
my inspiration was the intro cutscene where Sif eats the star, so my main goal was to adhere to the style of ISAT as closely as possible while transfering it to 3D space. And I knew i also wanted to try making the cloak for stopmotion purposes, so my process was tailored towards having control over the fabric with wire inlaid within the cloak (more on that later).
I ended up not sticking eyebrows on top of siffrin's bangs lol but anyways, first order of business is Gather Reference! v important. pureref is free and an awesome program. I also do some sketches to visualize the pose and important details i wanted to include in the sculpt.
behold the isat wiki gallery page! tawnysoup wrote an awesome ISAT style guide that absolutely rings true in 3d space too!! adrienne made a sif hair guide here!! (sorry i couldnt find the original link, but it's on the wiki). It says ref komaeda hair so that's what i looked at, along with other adjacent hairstyles! I also like doing drawovers on in progress photos to previs shapes n stuff to get a better idea of the end result.
Also if you're like me and struggle with translating stuff into 3D space, take a look at how people make 3d models and figurines! sketchfab is also a great resource! I looked at the link botw model by Christoph Schoch here for hair ref. (I used Maya, but there's a blender version too ! you can pose characters too if your model has been rigged!)


Face:
Started off blocking out the main shapes of eyelids and iris, and then filling in the colour details in the iris and the star highlights before moving onto adding thin black outlines and eyelashes. I didn't take many in-progress photos cause i kept ripping stuff out to redo them many many times, sorry!! This eye took about 3 hrs bc i just wasn't happy with it!! Sometimes it do be the vibe to give up, go to bed and see how it looks in the morning (more often than naught, it looks fine and it was the "dont trust yourself after 9pm" speaking)

The Mouth:
Couldn't decide if i even wanted to add a mouth as per usual with all my humanoid sculptures.. but i did some drawover tests first to see what expression i liked and to try to visualize it from multiple angles. (I was also testing the placement of stars on the hat brim here)

And then I redid the mouth like 3 times cause the angle just wasn't right (this went on for about the course of a week yay!)
Hair: woe baldfrin be upon ye


I made the hair strands individually first, and then since Sif has some of the hair at the back dyed black, i covered some of the tips with black wool (manually) (I think it would go much faster if i just took a marker to it, but hahaha i love pain and detailing!! )
And then the rest of it was positioning strands with sewing pins layer by layer, always looking at it from different multiple angles- sometimes tailoring the angle or swoop of individual hair flippies. At one point I thought the back looked too cluttered, but the hat covers a lot of it anyways!! yay for hiding mistakes! (imo this is a similar process to how cosplayers style wigs, but on a smaller scale and the same level of time consuming)
As always, look to your reference for guides, and I always do a whole bunch of drawovers over in progress photos to ascertain what was working and what wasn't.
Hat:
A trick to get a super pointy tip, make another tip seperately while keeping the connection point unfelted, and then combine the two to make super pointy hat!! (this also helps if you made the hat too short and need it to be taller. ask me how i know)

The embroidery on the hat brim was done in a hoop and then invisible stitched to the felted top portion. Technically you don't need a hoop but it helps keep the fabric tension, so you avoid puckers in your embroidery. You can also use iron-on stabilizer if your fabric is loose weave or particularly thin. this is the tutorial i used for the stars embroidery! particularly the fly stitch one, french knots, and the criss-cross stitches. highly recommend needlenthread for embroidery stitches and techniques! i learned all my embroidery from this single site alone.

For fabric, I think I used a polycotton i had in my stash,, unsure of the actual fiber content bc i bought it a long time ago. I used DMC Satin floss which was nice and subtle shiny but frayed a lot so it was kind of a pain to stitch with... but keep a short thread length and perservere through it!! After the embroidery was done, I folded up the raw edges and invisible sewed it to the top portion of the hat.
General shape:
Ok general structure of the body is this: wire armature body covered with black wool -> cloak lining & wire cage -> edge of lining is invisibly sewn to the main cloak at the hem -> head

Don't be afraid to mess around with the pattern, it's essentially a pizza with a slice taken out of it to form a steep cone shape!! Use draft paper before cutting into felt to save material! (i think i made like 3 cloaks before i was happy with the shape lol).
You can also hide the seam of the cloak and collars by gently messing up the fibers of the felt with your fingers or a felting needle btw! you can also sandpaper the seams according to Sarah Spaceman in this vid (highly recommend them for their in depth cosplay/crafting builds holy smokes), though since sif cloak is at such a smol scale, I just blended the seam with my felting needle.
For the lining wire cage section, I sewed in wire around the cloak, so the main rotation point is at the top neck area under the collar. These paddles are used to keep whatever pose I need the cloak to be in for stopmotion purposes. Then after the wire is done, I invisibly sewed the lining to the cloak at the hem (same technique as the hat brim to the lining there).
In hindsight, I should've used a thinner fabric for the lining, but i only had sheer white in my stash so had to go with double felt, thus resulting in a really bulky lining but oh well!

Heels:
started with the general boot shape, then tacking on the diamond shape heel stack and also diamond shape sole bc we're committed to the bit here. I skewer the boot onto the armature which also conveniently hides the connection point into the base to keep the whole thing upright and also I can rotate the boot to tweak the angle if needed.

Pins:
I kinda just trial and error'd jewellery wire with pliers into the pin shapes. They're itty bitty!! had a whole bunch of fails before i got two nice ones. A hot tip is to use needle nose pliers and wrap the wire around the tip to get a smooth circle shape!

Base:
I smoothed out the edge of a circular wood base with a dremel, and then used wood stainer to get the black colour. It ended up kinda looking like I took a sharpie to it, but whatever.... now i have a whole ass can of black wood stainer........ I then made a rough mountain of black wool and stuck the feet armature in. And now he's standing!!

Normally at this point when I'm done felting everything, to get a smooth finish, I'd take a small pair of scissors and carefully snip away any flyaway fibers, but this time, I just left them fluffy cause i think that's what sif would do :3c
Photoshoot:
Normally I do shoots using daylight but it was winter so the sun was nonexistent. So I broke out the home lighting setup aka dollarstore posterboard for a nice smooth background, and then hit it with the overhead Fill, side Fill 2, and Rim light, and use white paper/posterboard for bounce light if one side feels too dark. But if things are overexposed, you can move the light sources away until the harshness dims down. I'm using a Olympus mirrorless camera (handed down to me by my sibling so i dont remember the model exactly), which can connect to my phone as a remote so I can avoid shaking the camera when i take photos. Pretty nifty for stopmotion purposes! (yes my camera stand is a stack of notebooks, a tissuebox and some eva foam under the lens, don't judge me)


Stopmotion animation:
I'm still figuring stopmo out on my part, but my process was straight ahead animation ... move the cloak a cm, take a pic.... move another cm, click.... and repeat until i get a version I was happy with. My ref was the cloak animation from Gris (beautiful game btw). The 2d star animation was also done straight ahead using procreate, exported in png with a transparent background, and finally stitched together with the stopmotion footage in photoshop.

My turnarounds are also stopmotion! also secret hack, the turntable is a fidget spinner sticky tacked to a cake platter.
And i think that's all! i mainly wanted to share how I go about thinking about taking a 2d concept and moving it to 3D. I also didn't go in depth into how to actually do the needle felting bc I don't think I''d be very helpful I'm a very good teacher by telling yall to just keep stabbing until it looks right (i'm self taught for this hobby),,, if anyone wants it though, i can share a bunch of tutorials and other felters' process that helped me learn more needle felting!
Hopefully this was helpful to someone! Feel free to send asks if ya got any questions or if anything needs clarification! Or show me your works! I love seeing other people's crafts :3
here have a cookie for making it this far 🥐
#in stars and time#siffrin#isat#isat siffrin#isat fanart#needle felt#soft sculpture#know that i am devouring all the nice words yall leave in the tags/comments of my posts :holding back tears:#I hesitate to call this a tutorial bc this is just how i fumble my way through crafting anything lmao#the only reason I know how long I worked on a project are timestamps on wip photos and however long the day's video essay or letsplay is#sorry time is immaterial when i get into crafting mode#reason why this log is so late is bc after i finish a project i'm perpetually hit with the ray of 'i dont ever want to look at this again'#hence why photos never get edited#AND THIS POST SAT IN MY DRAFTS FOR 2 MONTHS DUE TO BLOODBORNE BRAINROT SORRY#done is better than perfect!!!#sorry i dont control the braincell#sorry for using a million exclaimation points! i am not good at this.. conveying my anxiety in written form!!! my toxic trait
1K notes
·
View notes
Text
Can't wait for Exandria Unlimited: Divergence? Check out its intro, as posted to the Critical Role socials!
Visual Effects by Christian Brown, 3D modeling by Axolote Gaming, and musical theme by Colm R. McGuinness.
Divergence is a four-part miniseries and premieres tonight, February 13, in all the usual places.
#Critical Role#Exandria Unlimited#Exandria Unlimited: Divergence#ExU Divergence#ExU spoilers#Critical Role spoilers
1K notes
·
View notes
Text

#ears be like that sometimes. i guess

baby's first likeness!! also my first time sculpting eyes so do not mind the SEVERELY scuffed nature of them i've gotta get some mileage under my belt before those'll look better. don't mind the lack of ears either i sculpted them and they turned inside out and made blender crash. i don't know why. they're on vacation for now
#OKAY BUT SERIOUSLY THAT'S REALLY GOOD#i'm in an 'intro to 3D character modeling' class right now and we're all bumbling babies#rad-roche#koilarist#roseyanon#funny#cool art#blender#fallout
59 notes
·
View notes
Text
As soon as I saw the Chibi intro, I knew I'd sooner or later draw it... it is so damn cute 😂


Lu Guang looks miserable instead of mildly concerned 😅 somewhat fitting? Idk.
Love Cheng Xiaoshi's face though.
I wouldn't have been able to draw this without the 3D models of csp 🙊
Reference:

471 notes
·
View notes
Text
Heroes of the Dragon Age
An animation I've made for Dragon Age Day 2023, featuring my main Warden (Alyssa Cousland-Theirin), Hawke (Eleena Amell Hawke) and Inquisitor (Sulevin Lavellan)!
It's to this day one of my best artwork and I thought I should share it here too! 90+ hours between the original sketch, outfit design, the rough animation, rotoscope, inking, flat-colours, background shading and even the audio :')
Interested in the process? I detailed it below since it was my first time doing something like that:
I would like to start by saying I'm not a professional animator!Everything you've seen here is the result of experimentation and a lot of practice to learn and understand how 2D animation works.

My first idea started in May 2023. I just finished rewatching DA Absolution for the X time, and wanted to analyse why I loved the intro so much. (Even after countless rewatch, I never skipped it once.) I was inspired to study it with my main three protagonists!


Then came the first test with Alyssa Cousland-Theirin, my Hero of Ferelden! I tried to understand which part to separate for the animation. Mainly the hair and cape because it flows a lot more than the rest! If I recall, my first idea here was to make her counter flame attacks (?). Then, as the camera turns around her, I tried to add a grid to know how the camera would work around it.
I ended up making the clip longer, so she could position herself to the further left and leave space to the two other protagonists.

Now it was time to try to animate Sulevin Lavellan, my Inquisitor. I really kept that quick doodling style just to capture the vibe without putting too much time/effort into it! The background would be static to contrast with Alyssa's. I also loved the idea of a rogue sneaking!

Instead of working on Eleena Amell Hawke, my Champion of Kirkwall, I went back to Alyssa and started working with Clip Studio Paint 3D models (this entire animation has been done on the EX version of the software!) It helped for rotoscope animation and maintaining likeness! That's when I got the idea to make the background swirl around the character to let the eyes be guided by the rest of the screen!

After a couple more hours, I planned the entire animatic with 3D models and quick doodles! I finally found a cool pose for Eleena Hawke, which was honestly the hardest of the three to imagine for some reason? I tried many other poses but ended up picking an animation from the game!


This whole time, I was studying a bunch of background ideas and how studio Red Dog Culture House (who made Absolution) work! Thankfully, they have a YouTube Channel where they shared some BTS content so I could analyse it!


Then, I simplified my character and their original designs in the style of the studio! These outfits are how I imagine them after Trespasser. Alyssa as the Queen of Ferelden, looking for a cure to the Calling, Hawke following Fenris to Tevinter & Sully as a Red Jenny Inquisitor!


The idea for Sulevin's animation actually came from a piece I doodled on a live stream, when I was drawing pose studies and turning them into finished artworks haha As for Alyssa, I wanted to draw the fight that got her facial scars!

Once their designs were ready and the background ideas too, I made the rough version of the animation! Basically a sketch done on top of the 3D models to add the details, staying pretty rough just to capture the idea and movements.


Then it was time to start the lines! I decided make a folder per frame, so I could separate all he main elements and draw them one by one. It helps keeping the likeness of a character in the different frames without having big "jumps" between frames! In fact, every parts were coloured differently to recognize them, and then I used vector erasers and masks (Ah yes, the entire lineart is done in vectors of course! It's easier to adjust and save time when working on similar frames!)


At first of course, everything overlaps! But I find it easier to draw too much and erase after, just to make sure everything is coherent in each frames! The cool thing about CSP is how you can change the colour of the layers in one click! So all the coloured lines turned into black in one second, and I could reverse it just as quickly to double check!

Then I started working on Sulevin! I made a blue line to mark where her feet were, as the sketch in the background wasn't perfectly straight! (Like Sulevin's sexuality 🤭😂) The silhouettes were very quick to do, but I had fun adding more & more details as she came closer to the foreground!

I really wanted to add that little dagger trick, but I remember it required me to change the pacing of Eleena's apparition, as it was recovering her arm too quickly! I had to change the pace of multiple frames quite a lot during the project, to make sure the flow was right! For Eleena, most of her animation remained around her arms and the staff itself, as magic would be the most difficult part! That way each character has their own focus: Alyssa has a very animated background, Sulevin got the grappling hook and Eleena the ice!

Then it was time to start adding colours! Just like for the lineart, I separated every colour on it's own layer, so I could easily adjust the colours later if needed. I added one colour at the time, going through all the frames, and then another colour!
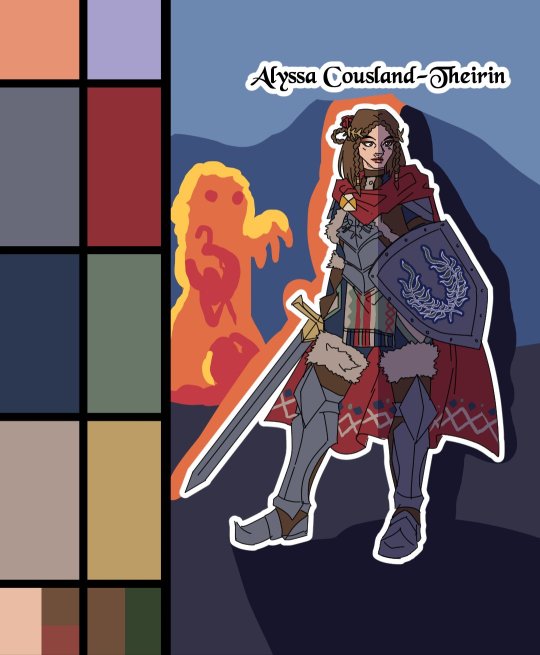
I made full palette tests with the colours I would use for their background at this point, checking if the details remained readable! Alyssa was the most challenging in terms of clothes, because I made her a very detailled armour! I had to simplify the Theirin heraldry, vectorize/redraw the Cousland, and make a brush for her cape's pattern!

Once I was done adding the flatcolours, I started the background, and oh boy it was a wild ride. For the cave, I painted multiple tests. I imagine was to use CSP panorama tools, which transform a texture into a 3D sphere, so each corners must match to look good. Sadly, it made the background very blurry, so after hours of testing, I changed ideas. Instead of the random fire balls (?) I originally imagined for Alyssa, I made three simple frames of a Rage Demon to attack her.


I ended up using the cave as a repeated pattern to make it turn 360° around the character. For Eleena, I mixed inspiration from the comics, Dreadwolf & Absolution, using warm colours matching Hawke's signature red. Just like I made the cave very grey/blue to match Grey Wardens. For Val Royeaux, it was more complex because I wanted to make it green, matching the Inquisitor's signature green. But bright green couldn't work, and the original colour during day time was blue/white/gold. So I added more leaves, played around the design a bit! After adding the rage demon, I made the shading! It was surprisingly easy and quick to do now!

I clipped a white layer on the flatcolours to not be distracted by the colours, and made thin lines to separate the light/shadows, then simply filled everything with the bucket tool! Then you set the layer to multiply and remove the white layer, and you have celshading shadows! Now the character looks out of the picture, so I added layers of blue in color burn, saturation and substract blending modes to make her look like she's in the right setting! Of course, I did the same with the other two, giving Hawke a red overlay and Sulevin green shadows!

Then I added the details, it went from white irises, to sword/staff smears to earrings and smaller finition that goes on top of these layers. To add the lights, I simply selected the shadows and reversed the selection! Using warm and cold tones to create contrast with the purple/bluish shadows! I also added more ambient light layers for Alyssa to reflect the Rage Demon fire. Now it was time to add ice magic! My first attempt had too many frames, making it look weird! Sometimes it's better to lower the frame rate to make things less bumpy!

Then I downloaded some cool ice brushes on CSP assets that made it look less like blue magical flames! But when I covered the screen in ice, I realized "Oh wait, I could make a cool transition from the ice, to blue lyrium turning red?"Red Lyrium truly links these three games and The Veilguard somehow! I spent the next hour painting over the idol and putting it in a black background, with lyrium and then the golden Dragon Age title text.
For the SFX, I used free youtube libraries sounds & "Darkspawn!" comes from the violent human female voice set (iconic for ""Can I get you a ladder? So you can get off my back!"😂🤭) After editing all that, the animation was finally done!

Here's the final math:
About 15 hours for the sketching/rough/animatic phase, 30h for the lineart, 25h for colours, 10h for backgrounds, 5h for details & 5h for music & SFX, for a total of 90 hours. Aka the same amount of time it took me to finish Baldur's Gate 3 the first time lol
If you have any question regarding the animation or the softwares etc. do not hesitate to ask, I'll do my best to answer!
#dragon age#dragon age origins#dao#dragon age 2#da2#dragon age inquisition#dai#da4#dragon age dreadwolf#dragon age the veilguard#animation 2d#original character#tutorial#warden#grey warden#warden cousland#alistair x cousland#alistair x warden#ferelden#hero of ferelden#queen of ferelden#hawke#fem hawke#eleena amell hawke#mage#warrior#rogue#lavellan#inquisitor lavellan#solavellan
318 notes
·
View notes
Text
some adjustiments


played around with the cpm mod last night
#original#abyssona#minecraft skins#2025#arm fins + slightly longer dorsal + pectoral/ear fin doesn't extend out as much#my irl hair is chin length so this just feels more correct#the cpm mod is cool. i've seen ppl do craaaazy things with it which i'm not interested in bc i like simplicity#but it like hit me how the polygons Work™️ and how you can save real estate by using duplicate polys#eg both arm fins are the same texture + the vanilla bracelets are different segments on the texture map#but i can save room by erasing one bracelet and putting both jacket polygons over the same bit on the texture map#i've been wanting to get into 3d modeling for years and tbh this might be a decent intro?#the numbers involved in modeling stress me out but this is like. Clicking.#whether that will actually translate into fiddling with blender idk but we'll see
1 note
·
View note